Blazor InputBase
[删除(380066935@qq.com或微信通知)]
更好的阅读体验请查看原文:https://blazor-university.com/forms/descending-from-inputbase/
InputBase<T>

该组件是各种 Blazor 输入控件从中派生的抽象类。 此类在标准 HTML 元素之上添加了其他功能, 例如验证 - 我们将在后面介绍。 因此,如果我们打算将组件用作用户输入,建议我们从此基类中降生组件。InputBase<T><input>
实现只是实现一个抽象方法和可选的一个虚拟方法的情况。InputBase<T>
InputBase<T>是具有名为 的属性类型的泛型类。 由于 Web 浏览器使用字符串值,因此此组件需要一种方法来将类型的值与字符串相互转换。TValueT
受保护的抽象布尔值 TryParseValueFromString(string value, out T result, out string validationErrorMessage);
TryParseValueFromString是一个抽象方法,应该重写它,以便从 HTML 元素(或其他处理字符串的源)放入目标类型 . 如果无法转换,则应将 设置为合适的消息以指示 转换失败。 这用于提供验证错误消息以及视觉无效状态,以便用户知道尝试 设置值失败。<input>TvalidationErrorMessage
受保护的虚拟字符串 FormatValueAsString(T 值)
FormatValueAsString是 的逆。 如果简单值不足以将值转换回浏览器 UI 层, 应重写此方法以正确执行任务。TryParseValueFromStringValue.ToString()T
创建输入颜色组件
首先,我们需要创建一个 InputColor.razor 文件。 在该文件中,我们需要指定为基类,并添加我们希望在 HTML 中呈现的标记。InputBase<Color>
System.Drawing是为类添加的,并且是为解析输入添加的 从十六进制代码转换为值。ColorSystem.Text.RegularExpressionsColor
我们要做的第一件事是 实施 .为了实现这一点,我们将简单地格式化 R、G 和 B 值 作为 2 位十六进制值。FormatValueAsString
要将十六进制字符串转换回 ,我们首先需要将 2 个字符的十六进制值转换为 .Colorbyte
接下来我们需要实现 .TryParseValueAsString
该代码使用正则表达式来确保值是格式为 6 个十六进制字符的字符串,前面有一个字符。 它捕获三组 2 位十六进制字符,并使用我们的方法将它们转换为字节。 最后,使用这些 RGB 值创建 。#HexStringToByteColor
因为我们英国人喜欢“颜色”这个词拼写正确,所以我们真的应该在组件中添加一个参数 允许其使用者指定在传递的值无效时使用的自定义错误消息。 添加属性。它可以随心所欲地称呼,但解析错误消息是使用的标准名称 在布拉佐。[Parameter]
然后更改在我们的方法中设置 的代码以使用它 参数,而不是我们的硬编码错误消息。validationErrorMessageTryParseValueFromString
为了便于将颜色显示为文本,让我们重构我们的方法以使用 静态方法,因此我们可以独立于 .FormatValueAsStringInputColor
我们的整个组件现在应该看起来像这样:
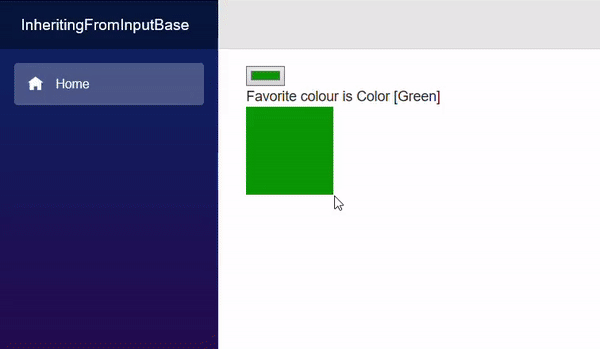
InputColor example
We'll make a simple page that let's the user choose a person's favorite color.
- 第 19-22 行
创建一个我们的意志绑定的类。EditForm - 第 12-15 行
创建此类的实例。 - 第 17 行
使用我们的静态将所选颜色转换为 Web 十六进制颜色字符串。InputColor.ColorToString - 第 9
行 创建具有内联样式的元素,该元素将所选颜色显示为实心框。<div> - 第 4
行创建绑定到我们页面的 .EditFormModelPerson - 第 5 行
使用我们的组件,该组件将呈现一个 HTML 元素供用户交互。InputColor<input>type=color